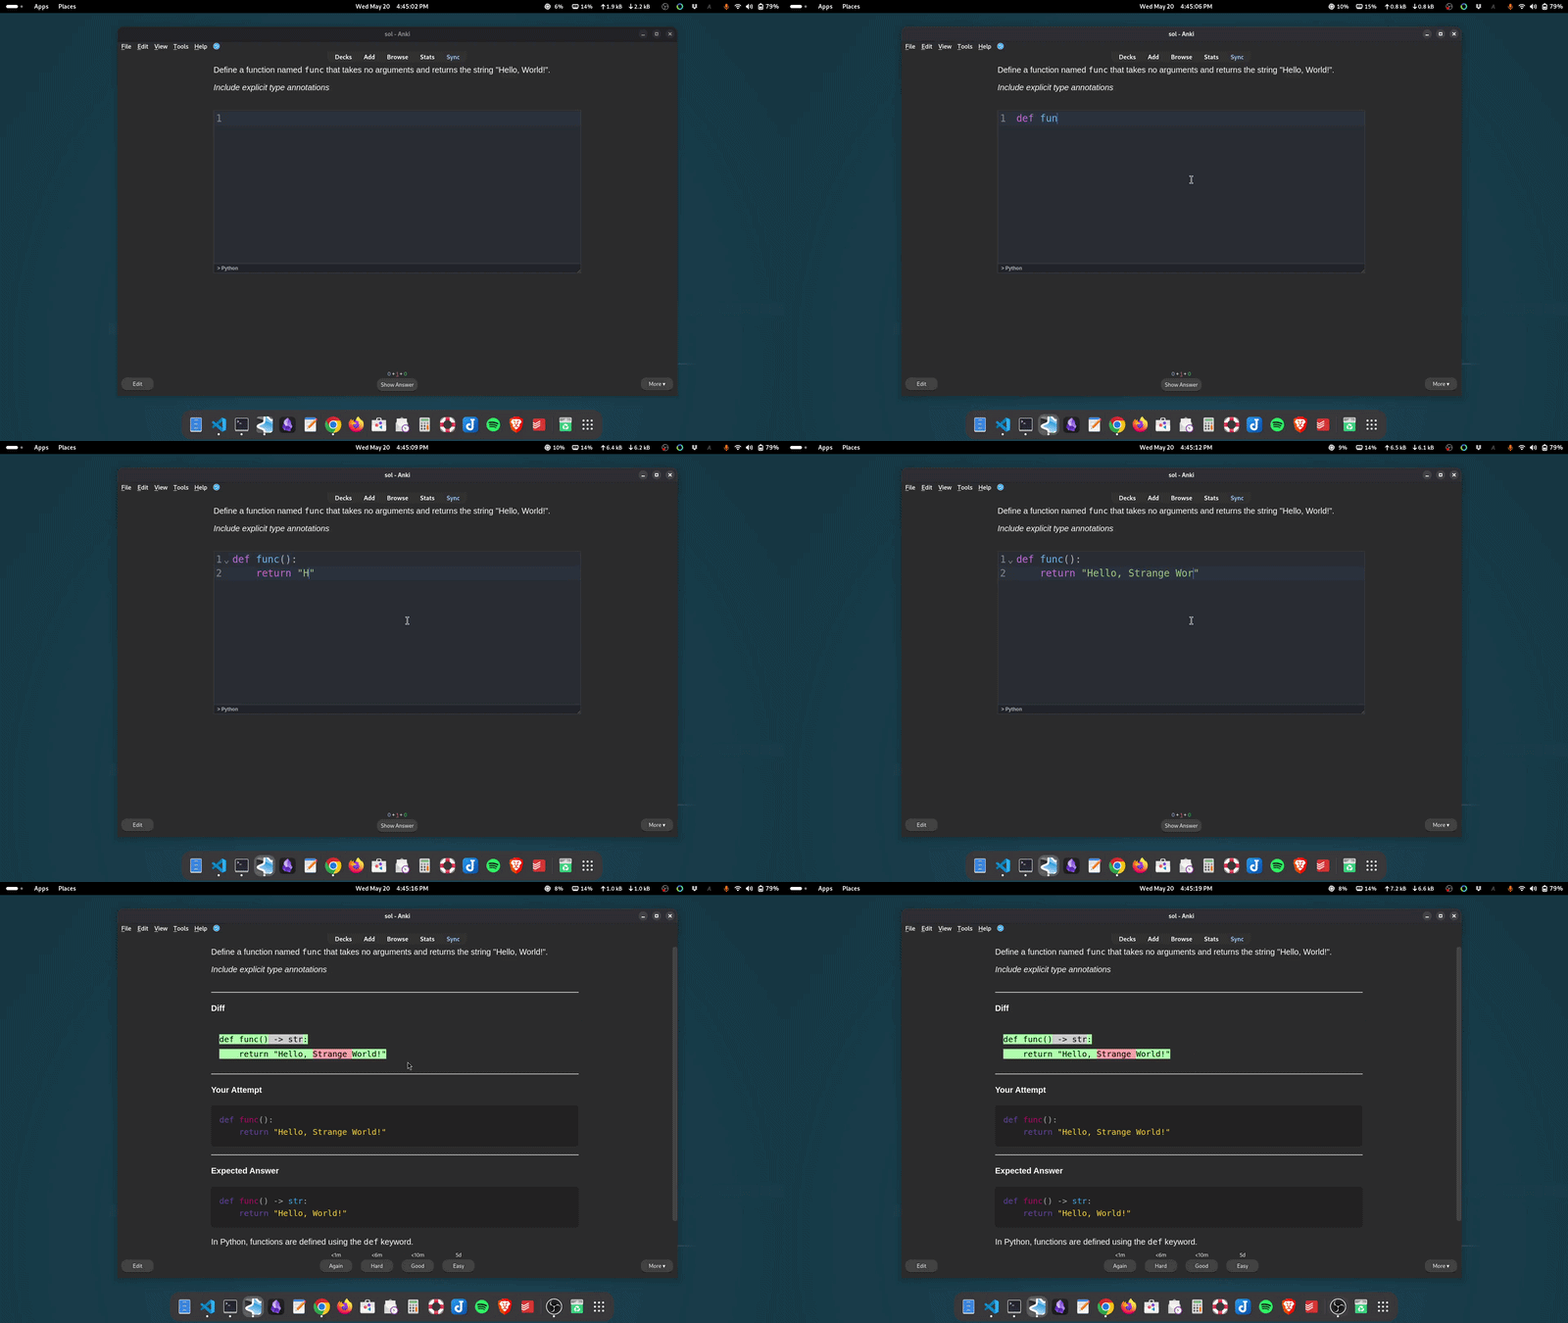
Code Your Answer
An Anki addon for coding practice. Type your answers in an IDE-style input field and get an instant, character-level diff against the solution.

⚠️ Compatibility
This add-on is only supported on Anki Desktop.
It relies on features that are not available on AnkiMobile and AnkiWeb.
Features
- Custom Note Type: Details below.
- IDE-Style Input: Powered by CodeMirror.
- Three-Part Review:
- Diff: A character-level comparison between your attempt and the predefined solution.
- Your Attempt: A syntax-highlighted view of exactly what you typed for your convenience.
- Expected Answer: A syntax-highlighted view of the predefined solution for your convenience.
Note Type Fields
The add-on creates a new note type (Code Your Answer) with the following fields:
| Field |
Required |
Description |
| Front |
✅ Yes |
The question/prompt |
| Language |
✅ Yes |
Language code (e.g., python, javascript, rust) |
| Back |
✅ Yes |
Your code answer |
| Back Extra |
❌ Optional |
Additional notes, explanations, or context |
Understanding the Diff
The Diff section provides a comparison of your code against the predefined solution. It uses the following color-coding to highlight discrepancies:
| Color |
Meaning |
Description |
 Green |
Match |
Characters you typed that match the solution exactly. |
 Grey |
Omissions |
Code that is in the solution but is missing from your attempt. |
 Red |
Extra |
Characters you typed that are not in the solution (typos, new names, extra logic etc). |

Creating Cards
The Problem with Anki's Default Editor
Anki's built-in editor converts whitespace to HTML entities ( for spaces, <br> for line breaks). This causes issues with the diff comparison, as your code won't match the solution due to formatting differences rather than actual code differences.
Solutions
Best: Obsidian_to_Anki
Use Obsidian_to_Anki to create cards from Obsidian markdown files. The plugin automatically converts code blocks to a format that works seamlessly with the diff, and looks great overall (in case you need formatted and syntax highighted code blocks on the front side and Back Extra)
Tutorial: Obsidian_to_Anki - How to use (3:31)
This is the recommended workflow when using this addon.
Good: Syntax Highlighter Add-on
Install Syntax Highlighter to create cards directly in Anki with proper code formatting (tested with default settings).
Not Recommended: Manual HTML
Manual HTML wrapping is unnecessarily cumbersome. If this approach is unavoidable, use an external editor (such as VS Code) to format the code:
<pre><code>def greet(name) -> str:
    return f"Hello, {name}"</code></pre>
Copy the entire block (including tags) and paste into the Back field. Obsidian_to_Anki or Syntax Highlighter are strongly preferred alternatives.
Field Guidelines
- Back: Include only the code you want compared in the diff
- Back Extra: Use for explanations, notes, or additional context that should not affect grading
The diff only compares the Back field code, so any supplementary information should go in Back Extra.
Keyboard Shortcuts
Designed for a hands-on-keyboard workflow:
Tab: Performs Indentation by inserting 4 spaces (for all languges). This ensures your code structure is clean and readable, a standard requirement for almost all programming languages (especially Python!).Ctrl + Enter (or Cmd + Enter): Submits your answer and reveals the back of the card.Ctrl + / (or Cmd + /): Toggles a line comment on the selected line(s) using the correct syntax for the active language (e.g. // in JS, # in Python).Shift + Alt + A (or Alt + A on Windows) / Ctrl + Shift + A: Toggles a block comment around the selection for languages that support it (e.g. /* */ in JS/CSS).
Editor Configuration
Go to Tools → Add-ons → Code Your Answer → Config to customise the editor. Restart Anki after saving for changes to take effect.
| Option |
Default |
Description |
theme |
"" |
Editor colour theme. Empty string uses the default themes (GitHub Light / One Dark) that follow Anki's light/dark mode. Set to a theme name to pin it regardless of mode. See the full list at fsegurai.github.io/codemirror-themes. View themes in action at the Playground. |
indentUnit |
4 |
Number of spaces per indentation level. |
indentWithTab |
true |
Allow the Tab key to indent. |
autocompletion |
false |
Show inline code completion suggestions. Disabled by default — keeping it off is recommended when using the editor for learning. |
fontSize |
14 |
Font size of the editor content in pixels. |
Some basic editor behaviours, such as bracket matching and auto-closing brackets, are hardcoded and cannot be changed. More options will be added in future releases.
Installation
Option 1: Install from AnkiWeb (Easiest)
- Open Anki
- Go to Tools → Add-ons
- Click Get Add-ons...
- Paste the code:
2050299569
- Click OK
- Restart Anki
The add-on is now installed and ready to use.
Option 2: Download as ZIP (Manual Install)
- Download the code: Click the green Code button at the top of this page and select Download ZIP.
- Unzip the folder: Extract the contents of the ZIP file on your computer.
Note: The ZIP extraction may create a nested folder structure (e.g., code-your-answer-main/code-your-answer-main/). If this occurs, navigate into the innermost code-your-answer-main folder and use that as your add-on directory.
Option 3: Clone with Git (Best for Updates)
If you have Git installed, run the following in your terminal:
git clone https://github.com/solmarita/code-your-answer.git
Finalizing Manual Install (Options 2 & 3)
-
Locate your Anki addons folder:
- Open Anki, go to
Tools > Add-ons.
- Click View Files to open the
addons21 directory.
-
Copy the project folder: Move the code-your-answer folder (or code-your-answer-main if that is the extracted folder name) into the addons21/ directory.
-
Verify the structure: After copying, your addons21 directory should contain:
   addons21/
   └── code-your-answer/
       ├── __init__.py
       ├── web/
       ├── src/
       └── ... (other files)
- Restart Anki: Close and reopen Anki to activate the addon.
Updating the Add-on
Asset Path Changes
This add-on uses Vite to bundle assets, which automatically generates unique filenames (e.g., front-BMzCq9aJ.js). When the add-on is updated or reinstalled from different sources, these filenames change, causing old card templates to reference broken asset paths.
Fixing Broken Cards After Update
If your cards stop working after updating the add-on:
-
Save your template modifications (if any):
- Go to Browse
- Find a card of type "Code Your Answer"
- Click Cards to view the template
- Review the Front, Back, and Styling sections
- Copy and save any custom edits to a text file
-
Create a .dev file in the add-on folder to force template regeneration:
- Go to Tools → Add-ons
- Click View Files to open the add-ons folder
- Navigate to the
2050299569 folder (Code Your Answer)
- Create a new empty file named
.dev (no extension):
- Windows/macOS: Open a text editor (Notepad, VS Code), leave it blank, and save as
.dev in the add-on folder
- macOS/Linux (Terminal): Run
touch .dev in the add-on folder (if you're familiar with the terminal)
-
Restart Anki to regenerate templates with current asset paths
-
Restore your modifications (if any):
- Reapply your template edits via Browse → Cards
- Delete the
.dev file from the add-on folder (otherwise your template modifications will be overwritten the next time you start Anki)
Your cards will now work with the updated asset paths.
Supported Languages
Notes:
- Vue and Angular support template syntax only. For component logic, use JavaScript or TypeScript.
- WebAssembly support is for the WebAssembly Text Format (WAST) only, not binary WebAssembly.
| Language |
Acceptable Aliases (Case-Insensitive) |
| JavaScript |
js, jsx, node, javascript, ecmascript |
| TypeScript |
ts, tsx, typescript |
| Python |
py, py3, python3, python, pypy |
| Rust |
rs, rustlang, rust |
| PHP |
php, php8, php7 |
| Go |
go, golang |
| Zig |
zig, ziglang |
| C++ |
cpp, c++, cc, hpp, h++ |
| C |
c, h |
| Java |
java, jar |
| C# |
cs, csharp, c# |
| HTML |
html, htm |
| CSS |
css |
| XML |
xml, svg |
| Sass |
sass, scss |
| Less |
less |
| Vue |
vue |
| Angular |
angular, ng |
| SQL |
sql, mysql, postgres, psql |
| WebAssembly |
wasm, wat |
| Shell |
sh, bash, zsh, shell, batch, ps1 |
| YAML |
yaml, yml |
| JSON |
json |
| Markdown |
md, markdown |
| Swift |
swift |
| Kotlin |
kt, kotlin |
| Dart |
dart, flutter |
| Ruby |
rb, ruby, rails |
| Scala |
scala |
| R |
r, rscript |
| MATLAB |
matlab, m |
Language Testing
Manual test status, verified by loading the language in the editor and confirming the following work correctly: syntax highlighting, auto indentation, auto-closing brackets, and bracket matching.
| Language |
Tested |
| JavaScript |
✅ |
| TypeScript |
✅ |
| Python |
✅ |
| Rust |
✅ |
| PHP |
✅ |
| Go |
✅ |
| Zig |
✅ |
| C++ |
✅ |
| C |
✅ |
| Java |
✅ (see known issues section below) |
| C# |
✅ (see known issues section below) |
| HTML |
✅ |
| CSS |
✅ |
| XML |
✅ |
| Sass |
✅ |
| Less |
✅ |
| Vue |
✅ |
| Angular |
✅ |
| SQL |
✅ |
| WebAssembly |
✅ |
| Shell |
✅ (see known issues section below) |
| YAML |
✅ |
| JSON |
✅ |
| Markdown |
✅ |
| Swift |
✅ |
| Kotlin |
✅ |
| Dart |
✅ |
| Ruby |
✅ |
| Scala |
✅ |
| R |
✅ |
| MATLAB |
✅ (see known issues section below) |
Known Issues
Auto-indent breaks in some C-style languages without a top-level wrapper
In languages like Java and C#, writing code outside of a class can cause the cursor to land at column 0 after certain lines (e.g. after };). Manually pressing Tab to indent should still work.
Affected (no wrapper):
String greet(String name) {
    int[] items = {1, 2, 3};
    // pressing Enter here → cursor lands at col 0
Not affected (inside a class):
class Greeter {
    String greet(String name) {
        int[] items = {1, 2, 3};
        // pressing Enter here → correct indentation
<script> and <style> tags do not auto-close in HTML mode
Typing <script> or <style> will not automatically insert the closing tag. This is a consequence of how CodeMirror's HTML language support works: these tags embed nested languages (JavaScript and CSS respectively), and it seems to prevent their tags from auto closing.All other HTML tags auto-close as expected.
Languages using CodeMirror Legacy Modes
The following languages use CodeMirror 5 legacy modes packages. Syntax highlighting works, but auto-indentation may be limited or unavailable. Manually pressing Tab to indent should still work.
Request a Language
Don't see your language? Check if CodeMirror supports it:
- Modern languages: https://code.haverbeke.berlin/codemirror
- Legacy modes: https://code.haverbeke.berlin/codemirror/legacy-modes
If you find it there, open an issue with the language name and I'll add it. If it's not there, I'll do my best to find a third-party package.
Development
DISCLAIMER: This addon is under active development and may change frequently!
Setup
Option 1: Clone directly to Anki's addon folder
cd <path_to_anki_addons_folder>
git clone https://github.com/solmarita/code-your-answer.git
cd code-your-answer
Option 2: Clone elsewhere and symlink
# Clone to your preferred location
git clone https://github.com/solmarita/code-your-answer.git
cd code-your-answer

# Create symlink in Anki's addon folder
# macOS/Linux:
ln -s "$(pwd)" <path_to_anki_addons_folder>/code-your-answer

# Windows (run as Administrator):
mklink /D "<path_to_anki_addons_folder>\code-your-answer" "%CD%"
Finding your Anki addons folder:
- Open Anki, go to Tools > Add-ons.
- Click View Files to open the addons21 directory.
Install dependencies:
python3 -m venv venv
source venv/bin/activate  # Windows: venv\Scripts\activate
pip install -r requirements.txt
npm install

# Enable dev mode
touch .dev  # Windows: type nul > .dev

# Build
npm run build
Development Workflow
# Make changes to __init__.py or src/ files
npm run build
# Restart Anki to see changes
Tip: Install AnkiRestart for quick reloads during development.
Dev Mode
The .dev file enables template auto-updates on Anki restart during development.
Disable dev mode before release:
rm .dev  # macOS/Linux
# Windows: del .dev